bridgit for Researchers: Manage, Annotate, and Share Your Data

If you are a researcher at an academic institution, bridgit is designed to streamline your research data lifecycle, from initial dataset preparation to secure sharing with the scientific community. With bridgit, you can annotate datasets, maintain data management plans, upload projects and metadata, and connect your setup directly to trusted repositories such as Zenodo or OSF.
bridgit has already been successfully started its beta testing at the University of Münster, where it was seamlessly integrated into the Sciebo Hochschulcloud NRW. This integration allows researchers to manage their data securely without the need to migrate files between platforms, ensuring both compliance and efficiency.
In addition to core features, bridgit offers unique functionalities that are particularly valuable for academic research: the ability to assign granular metadata at both project and inspanidual object levels and allowing researchers to work on their project while maintaining clear documentation of changes. bridgit also supports data usage and sharing permissions, giving researchers full control over who can access their data, where it is accessible and also when they want to share it.
By combining these capabilities in one platform, bridgit empowers researchers at universities to save time, reduce administrative burden, and ensure that their data is secure, FAIR-compliant, and ready for long-term reuse and impact.

FAQ
What are the prerequisites to use bridgit?
bridgit is designed to be easy to use, with no technical knowledge required. To get started, all you need is a Sciebo account (the university cloud service) that already contains your datasets. This is where bridgit will access your research data.
If you want to upload your projects to an external repository, such as Zenodo or OSF, you’ll also need an account with that specific service. bridgit acts as a bridge, securely transferring your data and metadata from your Sciebo cloud to the chosen repository.
Which repositories does bridgit connect with my cloud?
As of now, bridgit connects Zenodo and OSF (Open Science Framework) as external repositories where you can upload your projects to. However, we will greatly extend this list in the future. And if you miss support for a specific external service – feel free to contact us!
Why should I use repositories such as Zenodo or OSF to publish my research at all?
You should use Zenodo or OSF to publish your research because they connect your work to the broader scientific community. By uploading your projects through bridgit to these repositories, your data becomes findable, accessible, interoperable, and reusable - in line with the FAIR principles. This allows other researchers to discover, cite, and build on your work, while you remain in control of when and how your data is published.
I’m currently using a different repository, what should I do?
No problem! bridgit is still in beta, and we are continuously working to connect more services to meet the needs of researchers like you. If you want to use a repository that isn’t available yet, simply send us an email at sciebo.rds@uni-muenster.de.
We take every request seriously and are doing everything we can to expand bridgit’s capabilities, so your feedback directly helps us improve the platform and make it fit the way researchers work.
I don’t want to upload my research data, will bridgit still be of use for me?
Yes! Even if you don’t plan to upload your research data, bridgit is still a powerful tool for preparing and annotating your datasets. By adding metadata and organizing your files within bridgit, you ensure that your datasets are well-structured, clearly described, and ready for use in the scientific community.
Proper annotation and metadata alignment are crucial for data sharing and turns your data into reusable datasets. Using bridgit to prepare your datasets helps you work in a consistent, unified way that matches the expectations of clean scientific work. This makes your data more understandable, easier to reuse, and fully compliant with best practices, even if you never actually publish it.
User Guide
Follow this step-by-step guide to get started with bridgit and to see how easily you can manage, annotate, and share your research data from start to finish.
Step 0: Before creating any projects
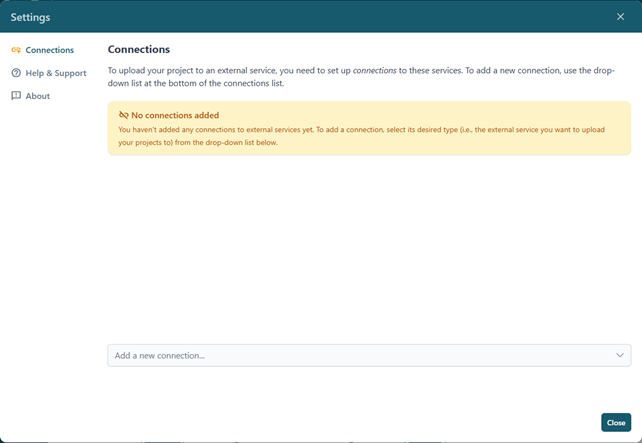
Before creating any projects, you will connect bridgit to external repositories of your choice (e.g. Zenodo, OSF, etc.) which you want to upload your datasets to later on. Connections are managed within your user settings, which you can open by clicking the little cogwheel icon in the top-left corner of bridgit’s interface. This will bring up a list of all your set up connections. This list will be, of course, initially empty – so scroll down and find the connect button to set up your first connection.
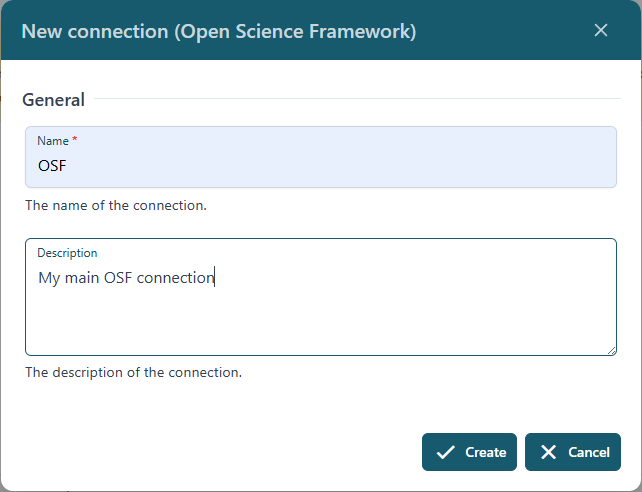
From the Add a new connection drop-down list, select which external repository you want to connect to, and a dialog where you can name and optionally describe your new connection will come up:
After clicking Create, the connection will now appear in your list but won’t be connected to your account of that external service yet:
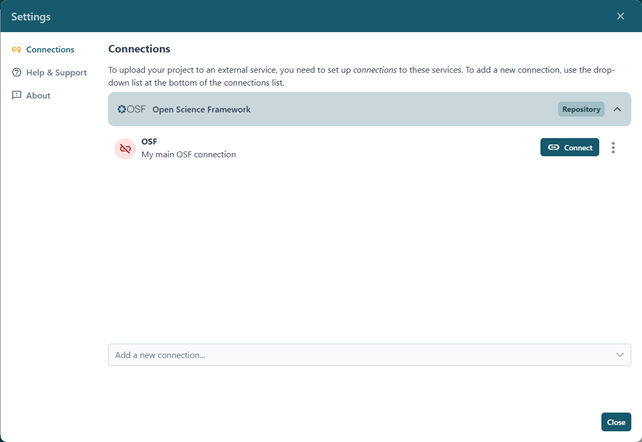
To connect your account, click on Connect. You will be redirected to the external website’s authorization service, where you can grant bridgit permission to use your account for uploading projects and their data. Once the connection is successfully established, it will be shown as “connections” in your list of connections, so you always know which data repository accounts are linked.

When you have set up all connections, you are ready to start creating your very first project.
Step 1: Creating a new projects
With your connections set up, it is now time to create your first project. To do so, click on the New Project button in the lower left part of bridgit. The following dialog will come up:
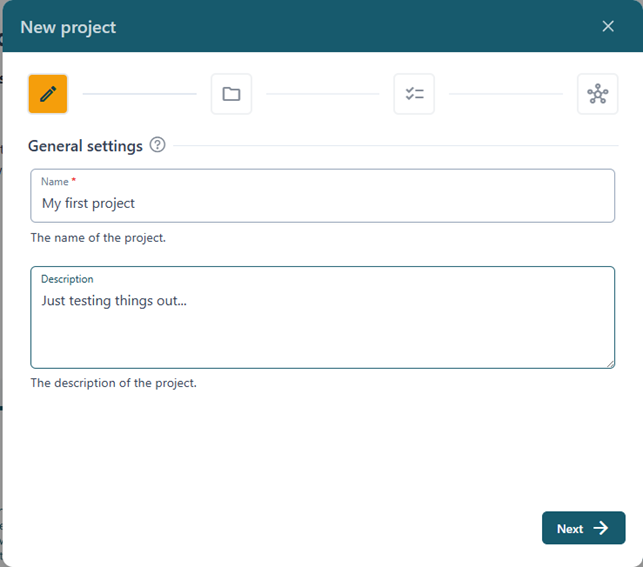
On this first page, you can give your project a name and add a short description. The name helps you easily identify the project later, while the description provides context about its content, purpose, or stage of progress. Taking a moment to add clear information here will make it easier for you and your collaborators to keep track of your work.

On the next page, called Data path, you can choose the location in your cloud where the research data for this project will be stored. Please keep in mind that this path cannot be changed later, so take a moment to select the right one.

Some features, such as the Data Management Plan, are optional and can be enabled or disabled on the next page. You can adjust these settings at any time later for your existing projects if needed.
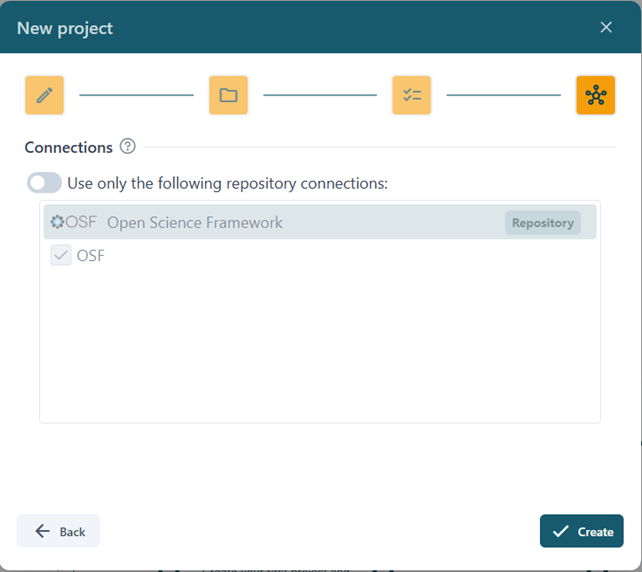
The last step gives you the option to limit your project to only certain connections you have set up before. Tip: this can be especially useful if you work with several repositories or accounts but don’t need all of them for every project.
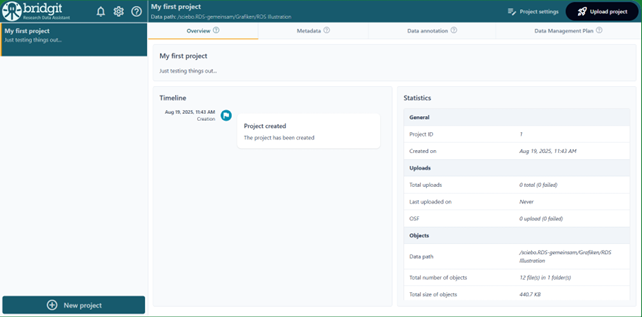
After clicking Create, the new project will appear in the main projects list and is ready to be edited.
Step 2: Project metadata annotation
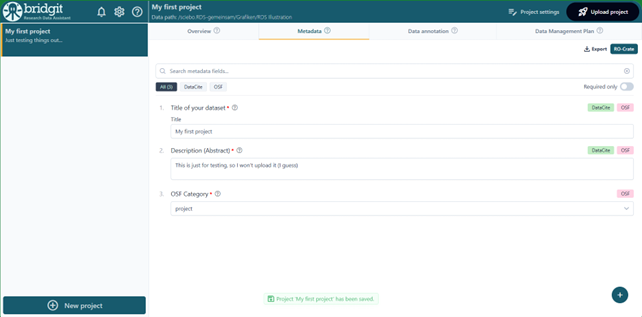
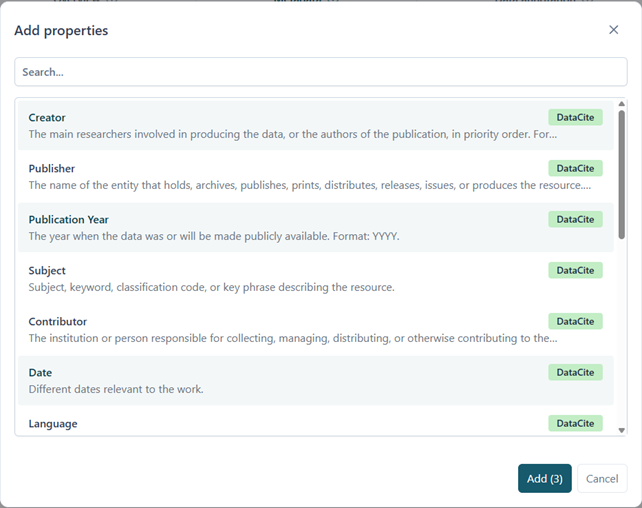
Each project has its own general metadata that can be entered in the Metadata tab, as shown above. By default, only a small number of available properties will be shown, but more can be added by clicking on the little + sign in the lower right corner. You can select the properties you want to add to your project. By clicking on this +, a pop up will provide you with the following dialog:
Step 3: Data annotation
Individual file objects can be annotated in the Data annotation tab:
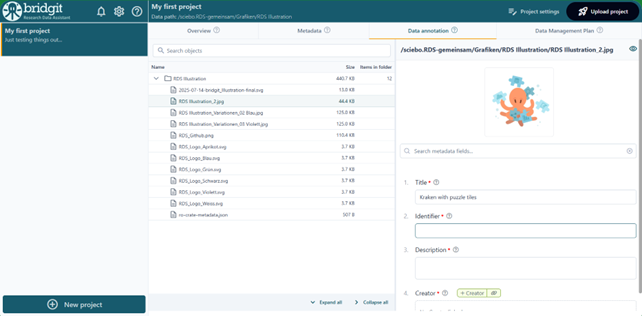
The file tree on the left displays all files and folders included in your current project. To add metadata, simply select one or more files or folders and enter the information you want. For many common file types, a preview is also available, making it especially easy to annotate images, documents, and other visual content.
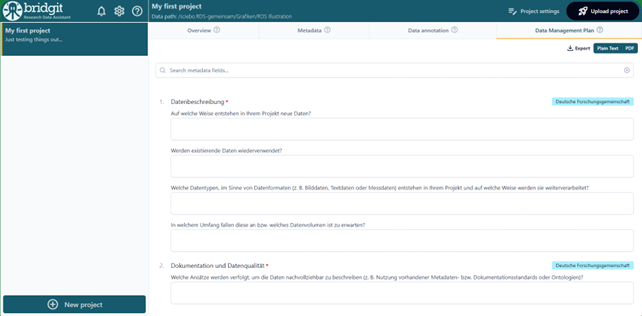
Step 4: Data management plan
The data management plan allows you to assess a Data Management Plan using a simplified interface:
Step 5: Uploading a project
Once you have completed the editing of your project, it is time to upload it to an external repository like Zenodo or OSF. To do so, click on the Upload project button in the top right corner of bridgit, which will bring up the following dialog:
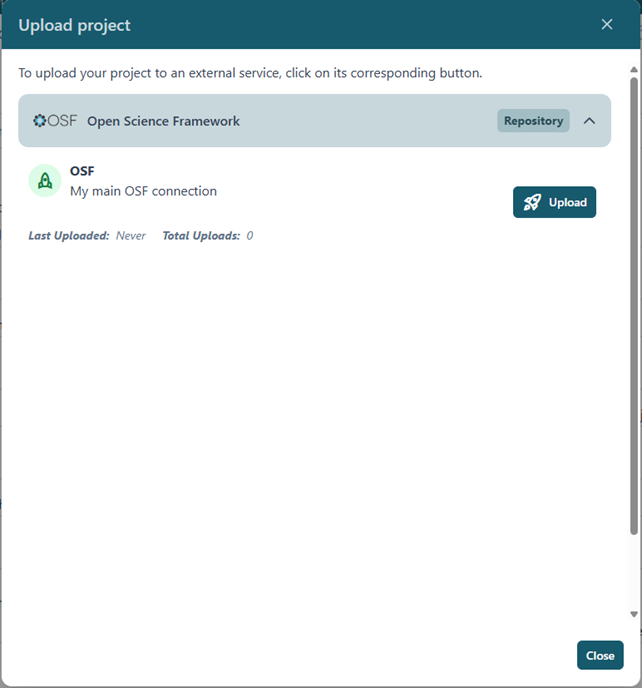
To upload your project to a specific service, simply click on its corresponding Upload button. bridgit will now upload all data that belongs to your project, including its files and metadata, to the external repository:
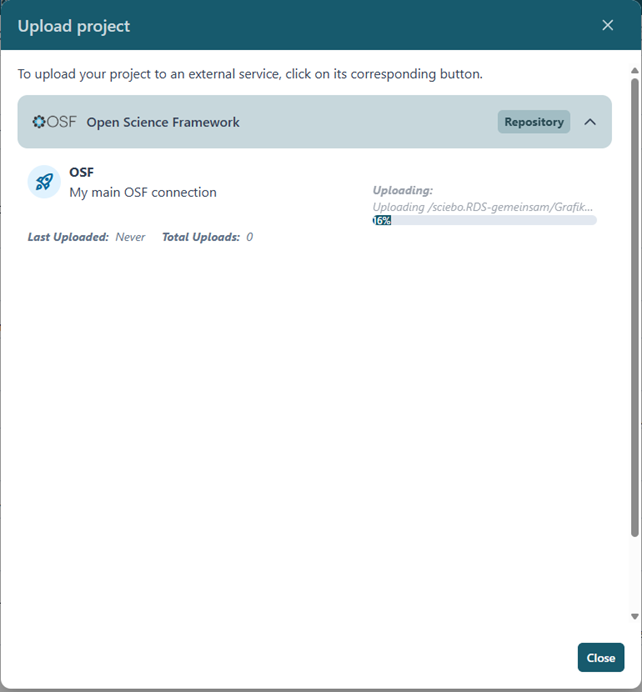
Don’t worry! This process runs in the background, so you are able to close this dialog while the upload is still running; you can even close bridgit, your project will still continue to upload.
Unless you have published your project, it is always possible to re-upload the project again. This will simply use the same external project but replace everything that had been uploaded before.
Please note: To ensure your data safety and keep your control over your own data, the actual publication of a project must be done using the website of the external repository which you have uploaded your project to.
bridgit FAQ
General
Who can use bridgit?
bridgit is available to all registered users of the sciebo cloud, especially researchers at universities in North Rhine-Westphalia (NRW) and their cooperation partners.
Do I need any technical background to use bridgit?
No. bridgit is designed to be intuitive and user-friendly. No programming knowledge is required.
Is bridgit free to use?
Yes. bridgit is a free service for users of the sciebo university cloud.
What are the FAIR principles?
FAIR stands for Findable, Accessible, Interoperable, and Reusable. These principles ensure that research data can be discovered, accessed, and reused by others in a transparent and meaningful way.
Uploading & Publishing Data
How do I upload my data from the sciebo cloud?
bridgit connects to your personal sciebo cloud instance. You can select, describe, and annotate the datasets you want to share directly in the app.
Where are my data stored?
Your data remain securely stored in your sciebo cloud account. It is only transferred to an external repository (e.g., Zenodo, OSF) when you explicitly choose to upload it.
How do I publish my data to OSF or Zenodo?
bridgit supports direct file uploads and metadata export to repositories like OSF and Zenodo. Once reviewed, the final publication needs to be initiated through the repository's website.
Metadata & Documentation
What kind of metadata do I need to provide?
You’ll be guided to enter essential metadata such as title, authors, description, keywords, license, and project context. Accurate metadata helps increase the visibility and reusability of your dataset.
Can I add a README or other documentation to my dataset?
Yes. bridgit supports the inclusion of accompanying documentation like README files or data dictionaries. You can upload a README to your sciebo project folder and include it when exporting your dataset to a repository.
Datasets & Data Management
How can I ensure my data complies with my institution’s data management policies?
bridgit does not enforce specific institutional or funder policies but encourages alignment with your institution's best practices. The app supports clear documentation of data sharing processes to help meet common compliance requirements.
Can I restrict access to sensitive data?
While bridgit assists in preparing data for open sharing, you retain full control over what is published. Sensitive or personal data should be anonymized or excluded before publication, as bridgit cannot take responsibility for verifying anonymity or legal compliance.
Does bridgit support version control of datasets?
Currently, dataset versioning must be managed within the connected repository (e.g., Zenodo).
Collaboration & Integration
Which data platforms can I connect to bridgit?
bridgit currently integrates with Zenodo and OSF (Open Science Framework). Additional platforms may be supported in future releases.
Can I collaborate with other researchers or students?
Not yet. bridgit does not currently support shared workflows via sciebo or repositories. However, it facilitates collaborative dataset preparation by allowing multiple users to work on metadata and documentation jointly before uploading.
Can I reuse previously uploaded datasets in new projects?
Yes. If a dataset has been published under a reusable license, it can be cited and reused in future research projects.